

The Musical Fidelity M1 DAC shares some of the same DNA as the awesome Tri-Vista 21 tube DAC. Come along as I upgrade this M1 and discover just how good she can sound.
Think of the Musical Fidelity M1 DAC as the little DAC that could. For its very modest asking price, you got and get a lotta DAC for the money. Excellent technical performance, good looks and smooth sound make the M1 DAC a winner, especially now on the used market. The changes I’ve designed here elevate its performance to the next level.
UPDATE – Jan 2019 – The M1 DAC is for sale!
UPDATE – Jan 2019 – SOLD!

Design & Features
The M1 DAC has, at its heart, the TI/Burr-Brown DSD1796 DAC chip. The DSD1796 is a high-spec chip, with excellent signal-to-noise performance and very low distortion. It’s not as good as the DSD1792 found in the Musical Fidelity Tri-Vista 21 DAC and others.
Both chips are in current production (in 2018) and the DSD1792 is still the second most expensive audio DAC chip TI sells. In qualities of 1000+, the DSD1796 retails for around $3USD a piece though, vs $12USD each for the DSD1796, reducing manufacturing costs considerably.

The M1 DAC uses a switched-mode or switching power supply, not “switch-mode” as you’ll often see them mistakenly called. A switching power supply or SMPS is cheaper to make than a linear power supply. They are also better suited to standby operation and multi-voltage usage, but alas, they are also noisier.
Usefully, the M1 DAC has four digital inputs – coaxial, TOSlink, AES/EBU and USB. These toggle with a tactile push button on the front panel. Fit and finish are very good and the DAC feels very solid and well-built, which it is.


Versions
There are two versions of the M1 DAC. The first was produced until the end of 2010 and has the cleanest internal layout. Its limitation is the USB input, which only accepts data at up to 16/48kHz. Many won’t care about this, I for one.
The second version, produced from January 2011, has an improved USB input accepting data at up to 24/96kHz. The layout of the output buffer is more cramped, but MF may have cleaned up the grounds because the second version measured slightly quieter in Stereophile’s testing.
Musical Fidelity M1 DAC Specifications
Courtesy of Musical Fidelity
Performance
- Jitter: <12 picoseconds peak to peak
- THD(+ noise): <0.0025% 10Hz to 20 kHz
- Frequency Response: +0, –1dB, 5Hz to 100 kHz
Inputs
- XLR AES balanced digital input
- RCA coaxial connector SPDIF 32-192 kbps (16-24 bit stereo PCM)
- TOSLINK optical connector 32-96 kbps (16-24 bit stereo PCM)
- USB type ‘B’ connector for computer/PDA - 16-24 bits, 32-96 kbps (Determined by source file/computer settings)
Outputs
- Line-level RCA (single-ended)
- Line level XLR (balanced)
General
- Dimensions - WxHxD (mm): 220 x 100 x 300
- Weight (unpacked/packed): 3.4 kg / 4.1 kg
Reviews
The M1 DAC was generally well-received at the time of release. Stereophile enthusiastically reviewed the M1, with Sam Tellig stating:
“What I mainly heard from the M1 DAC was nothing: an absence of artifacts, if you want to get fancy. There was no fudging of detail, no smearing of transients. Purity of tone was exceptional—and this remained true when I took the M1 DAC upstairs to play with its brother, the M1 HPA headphone amp. So addictive is this DAC that I can’t bear to replace it with another…”
Sam Tellig
As Stereophile’s test engineer, John Atkinson said himself, after putting the M1 DAC on the test bench:
“It may be affordably priced, but in almost all ways, Musical Fidelity’s M1 DAC offers performance that is close to the state of the art.”
JA
It’s quite clear from these comments that these guys were very impressed with the M1 DAC. Many others were too, like Audio Stream, TechRadar and HiFi Review.
Liquid Audio Upgrades
The M1 DAC sounds good out of the box, dead quiet, smooth and grain-free. But it’s also somewhat dull, lacking air, resolution and microdetail, compared to the best DACs I’ve heard and owned. I wanted to see what I could do for this little DAC in terms of some modest, carefully implemented improvements.
I planned a series of upgrades, similar in spirit to those I developed for the Tri-Vista 21 DAC, and more recently this Tri-Vista 21 DAC. As usual, I focussed on the power supplies, DAC and signal path, utilizing better quality parts and greater attention to bypassing and decoupling.
As I often do, you can watch an accompanying video to this article over on my YouTube channel:
Before…
It’s worth taking a look at everything before we start, to see what Musical Fidelity did and where improvements can be made.


After…
Now, let’s look at how I improved things for the M1 DAC.


Further Improvement
Is there room for further improvement? Of course, but I believe the art lies in finding the balance between price and performance. This is a budget DAC and I’ve hopefully created the best bang-for-the-buck improvements one might reasonably make to an M1. The DAC has limitations, most notably in terms of the output buffer. Not much can be done here, other than to focus on the coupling capacitors and possibly change the quad op-amp for something better.
Realistically, the amount of work and quality of parts I’ve used in these modifications take this M1 DAC to its limit. I would not suggest doing any more, because returns will be limited. I hit all of the low-hanging fruit, without overreaching. Some design limitations of the M1 such as that non-discrete output buffer I mentioned would require surgery to circumvent. Discrete op amps might help, but for me, that’s probably a bridge too far.
Performance
So, how does my modified Musical Fidelity M1 DAC sound after all this hard work? Fantastic! The upgrades have given her what I hoped they would – more air, more oomph and a more relaxed, musical sound. The DAC sounds less dull, more involving, resolves more detail now and is a big step up from stock.
I suggest utilising the balanced outputs wherever possible. Balanced signal transmission is technically superior and sonically beats the single-ended output, with obviously better bass performance. With balanced equipment, you get the added benefits of lower noise and the negligible impact of longer cable runs.
The Bottom Line
If you want to buy an M1 DAC and enjoy it as is, go for it. They sound great out of the box and are very capable for the money, which isn’t much these days. Alternatively, you may already own one and be looking to improve its performance. This is worth considering and, if done right, you’ll end up with a strong performer, definitely better than standard.
The M1 is no giant killer and does not perform as well as the PS Audio NuWave DSD is for example, but I definitely recommend the Musical Fidelity M1 as a high-performance, budget DAC, with a strong performance for the money and a solid upgrade path, should you wish to take it.
Get in touch if you’d like me to improve your M1 DAC.
Footnote
If you’ve enjoyed this article and appreciate the time and effort that went into creating it, you can say thanks by shouting me a drink or making a donation via the contact page or the donate button in the footer. You can feel good about giving something back too, because very few people bother, which is why I’ve stopped producing this style of article.
Thanks again for visiting!
Musical Fidelity M1 DAC
$450 - $850 AUD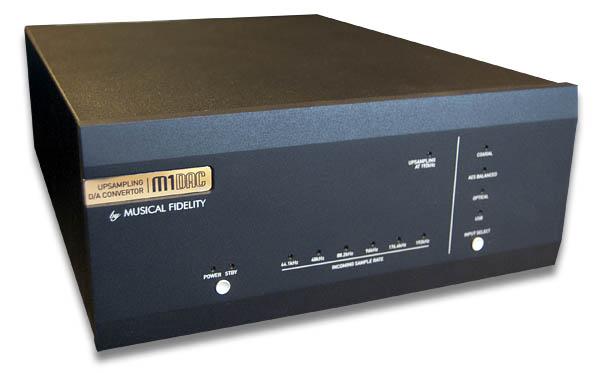
Pros
- Well-built for the money
- Balanced outputs + USB input
- Solid performer, can be improved improved
- Great overall value
Cons
- Limited USB spec in Rev 1
- Op-amp output buffer
- Cheap factory components
- No physical power switch
- Switching power supply


Seems to be a nice upgrade!
Do you have list of components?
Jérôme.
Hi Jerome and thanks for the feedback. This series of mods I came up with works well, though I don’t supply kits or lists of parts for any of my upgrades. I modify customer equipment to order, based on budget etc, so I’d need your DAC here for that. The M1 in the article is going up for sale though, should be on my For Sale page soon.
+Hi Mike, would it be ok to ask roughly what this job cost ?
Thank you, Richard, Hobart Tasmania
Hi Richard, thanks for your question, this was a proof of concept rather than a customer job, so I didn’t cost it out in the normal way. I prefer to chat about specific customer requirements including budget, shipping etc via phone or email, as this helps me arrive at an estimate. Feel free to call or email to discuss!
Hi
I have a M1 DAC, if the upgrades were done and using the burson V6 opamp, how much would I need to spend to get the same quality after the upgrade
Thanks
Sean
Hi Sean, thanks for your question, though part of it needs clarification. The package I’ve designed for the M1 DAC doesn’t include opamps, I can add them to the job, but that will, of course, change the price and we still have the limitation of the quad opamp. I also cannot verify that they will work well in this application until we test them, both mechanically and electrically. You mention wanting to know how much it would cost to get “the same quality after the upgrade” – the same quality as what? This part isn’t clear. We can discuss booking her in, probably best to give me a call or chat to me via my Contact page – https://liquidaudio.com.au/contact/.
Hi
Ive done the upgrade to include changing the opamps and wow, what a change to the Brunson, recently compared to RME ADI 2 Fs and stacked up very favourable that I resold the RME in preference to the M1.
Sean
Burson
Good news Sean, Merry Christmas and glad you found the article useful!
Kannst du mir die kompenentenliste per mail.schicken lg
Hi Michael, thanks for your enquiry but I don’t supply parts lists, kits or instructions.
Hello. Is upgrade possible for Marantz Pm15s2? What type? How much would it be?
Thanks. AJAY
Hi Ajay, yes, anything can be improved. Costs depend on your budget to a large extent. Best to get in touch via my contact form and we can discuss the options, or give me a call during business hours.